TUBELESS
WHAT ARE THE ADVANTAGES OF A TUBELESS TIRE?
Tubeless tires offer clear advantages in terms of speed, comfort, grip and puncture resistance. Unnecessary friction between tire and tube is avoided. As a result, the rolling resistance is significantly lower than with tube type tires or tubular tires. You can ride tubeless with a lower air pressure without sacrificing performance. This brings advantages in comfort but also more control in critical situations and on bad roads. At the same time, tubeless systems offer a high level of puncture protection. The risk of punctures is significantly lower. A sudden loss of air due to a burst tube or valve tears is impossible. In addition, tubeless systems work very well in combination with puncture protection fluids. Punctures are then sealed again within tenths of a second.
ARE TUBELESS TIRES FOR EVERYONE?
The advantages are particularly interesting for sporting riders who want maximum performance. The system is technically demanding and requires a tubeless compatible wheel. If you are looking for a low-maintenance set-up, then the conventional tube system is the right choice for you. If you want the best riding performance, then the tubeless system cannot be surpassed.
WHAT IS REQUIRED TO MOUNT A TUBELESS TIRE?
- Schwalbe tubeless tires
- Airtight tubeless wheel (or a tubeless compatible wheel and tubeless rim tape)
- Tubeless valve - sealing fluid (e.g. Schwalbe Doc Blue)
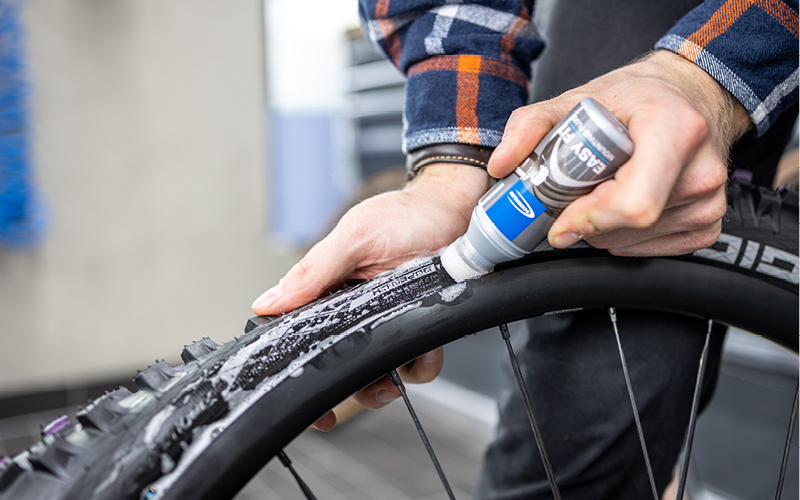
- Assembly fluid (e.g. Schwalbe Easy Fit)
- Floor pump with pressure gauge
- A cleaning cloth
! NOTE: A compressor or the Schwalbe Tire Booster are very helpful if there are problems with inflation.
! NOTE: You should be familiar with the specific assembly process or leave the assembly to a professional.

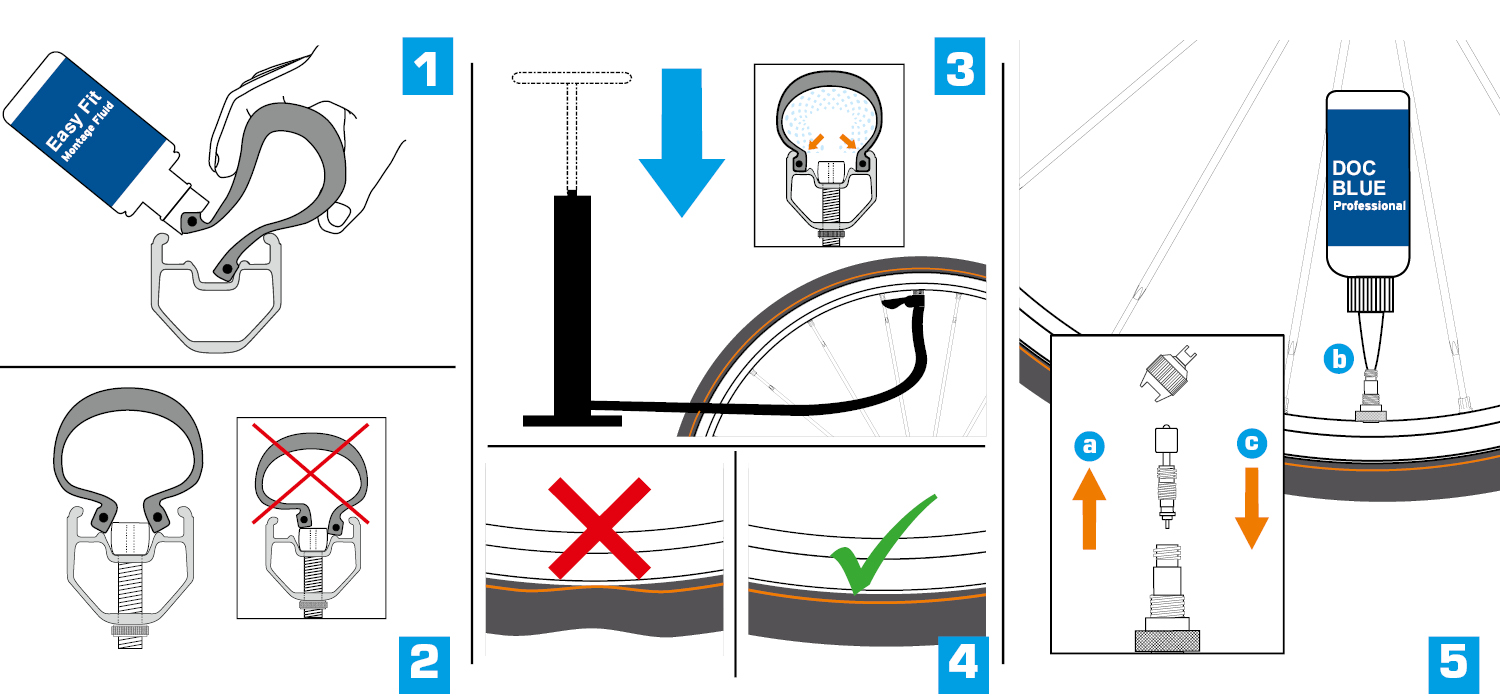
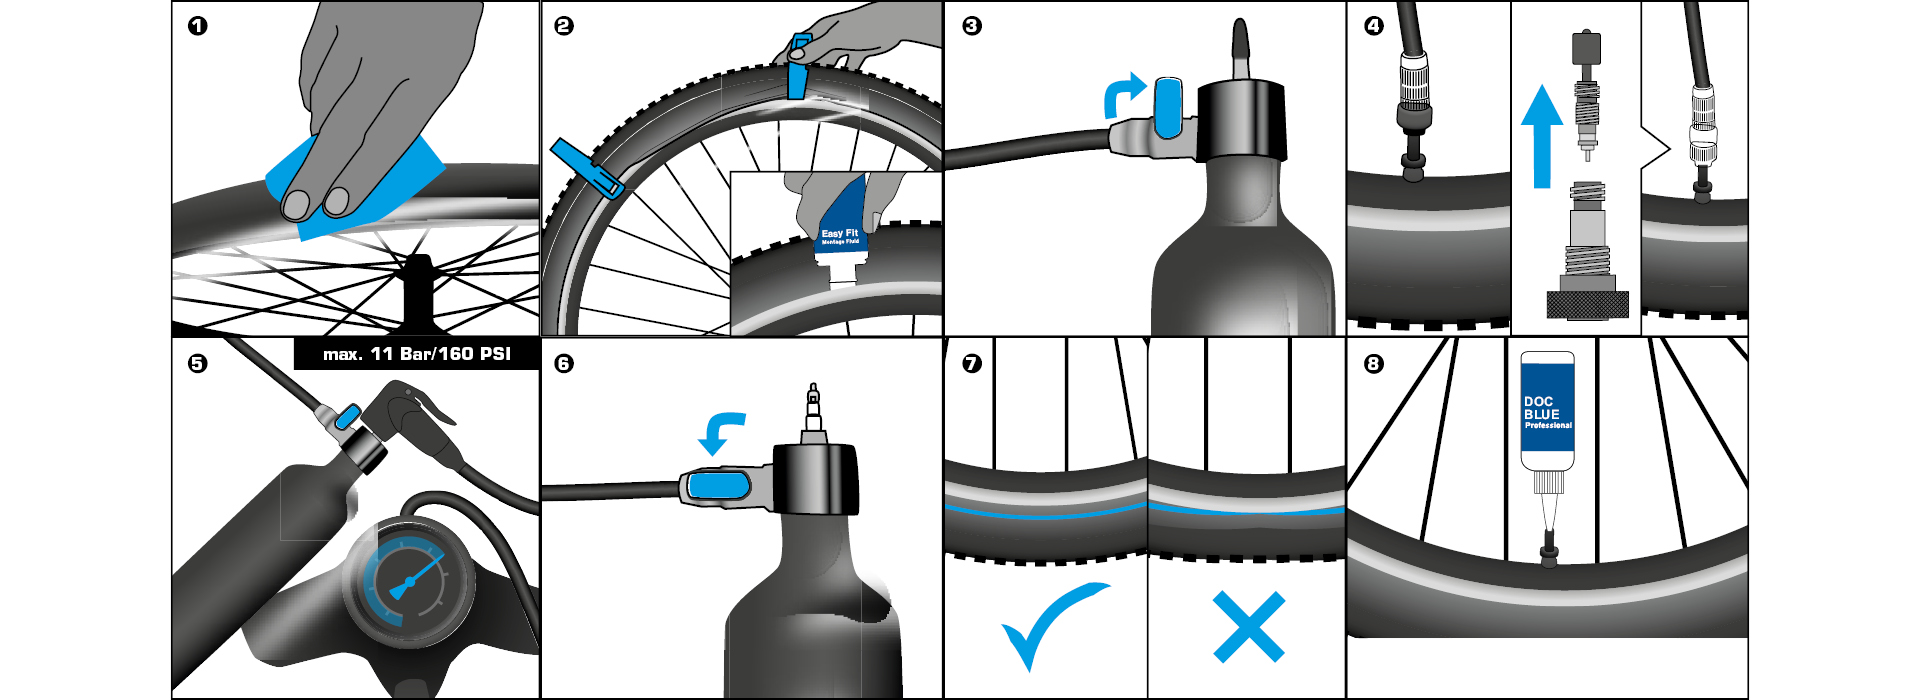
Mount the tire on the rim as usual. Use tire levers carefully. Important: Before inflating, coat both tire beads with assembly fluid (1). The valve must be between the beads when inflating (2). A strong blast of air is required for the first inflation (floor pump, compressor or Tire Booster) (3). The tire snaps audibly into place on the rim. Check that the tire is correctly seated on the characteristic curve (4). Then release air again. Remove the valve insert (the valve key is included with Doc Blue) and fill in 60 ml of Doc Blue puncture protection liquid (5). It is best to start directly at the first exit. The milk seal is not complete until the tire has flexed and the carcass is fully wetted. Pump up again after 24 hours.
! NOTE: It is essential to observe the information on the maximum air pressure for tires and rims. If the maximum pressure stated for the rim is lower than the maximum pressure shown on the tire, it is essential not to exceed the lower maximum pressure stated for the rim.
! NOTE: Please do not use CO2 cartridges for inflation. The CO2 has an unfavorable effect on the puncture protection fluid.
! NOTE: In general, care should be taken when handling the sealing fluid. Slight permanent stains appear if the fluid comes into contact with clothing or furnishings.
APPLICATION For preventive puncture protection and tubeless conversion.
Filling quantities: tires from 23 - 60 mm -> 60 - 90 ml/tire, from 62 - 100 mm -> 90 - 120 ml/tire. Shake well before adding to the tire! Works for up to 7 months. Not suitable for large defects (cuts/bursts). Tubeless conversion only with tubeless compatible wheels and tires.
DO I HAVE TO FILL THE FLUID THROUGH THE VALVE?
No, you can also pour the sealing fluid directly into the tire before you mount the second tire bead. Subsequent filling via the valve has the advantage that you can work "cleaner" because the fluid only comes into play when the tire has already snapped into the rim. This is very convenient, especially with new tire/rim combinations, where you don't yet know whether the assembly will work without any problems. With known combinations, direct filling is of course faster. If you use valves without exchangeable valve inserts, filling through the valve is not possible at all.

WHY DO YOU NEED SEALING FLUID?
Tubeless Easy tires are not airtight tubeless tires. A special puncture protection fluid is required to create the necessary seal.
Real tubeless tires, as they were common in the past, could theoretically do without the liquid. But they were much heavier and in practice they were still mostly driven with sealant. Only the sealing fluid made the system sufficiently reliable.
In addition, the combination of Tubeless Easy tires and Doc Blue offers excellent, preventive protection against punctures.
HOW OFTEN DOES THE SEALING FLUID NEED TO BE TOPPED UP OR RENEWED?
Doc Blue remains active for around 2000 km or 2-7 months as preventive puncture protection in the tire. Once the system is tight, you don't necessarily have to refill the sealant fluid. Of course, you only have the additional protective effect against punctures if there is still active sealant fluid in the tire. We recommend checking and replacing the sealing fluid before a competition or a larger tour. If you don't mind the extra weight, you can simply fill in additional sealant.
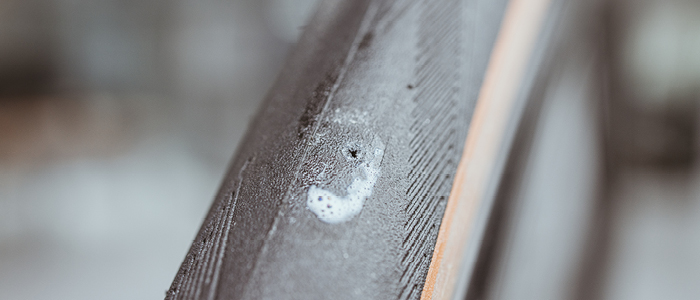
A needle can be used to test whether the sealing fluid is still functional. Just pierce the tread and let the tire rotate. If the hole does not seal automatically, you will need to refill sealant. The "test hole" is then repaired by the new sealant. In order to avoid sticking, it is advisable to position the valve at the top point when storing for a longer period of time.
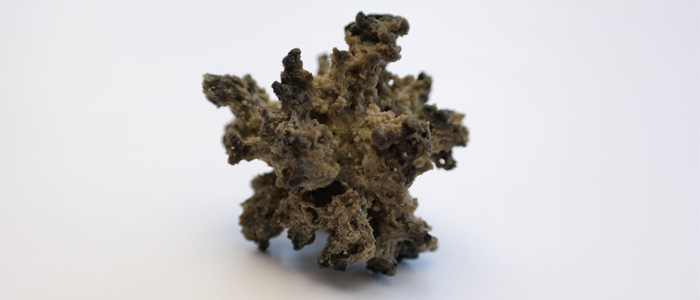
Doc Blue remains active for around 2000 km or 2-7 months as preventive puncture protection in the tire. The period varies greatly depending on the ambient temperature. It then dries into a rubber film or separates into individual components such as "latex coral" and fluid.
WHAT HELPS IF THE TIRE CANNOT BE INFLATED?
Inflation is often the biggest problem when mounting a tubeless tire. Especially with more classic rim shapes that are not optimally designed for tubeless assembly, the air often escapes uncontrolled between the tire bead and rim when pumping. The following tips and tricks may help:
- Check that the valve is positioned between the tire beads.
- Assembly fluid such as Easy Fit! The lubricating film makes it much easier for the tire beads to slide into the intended position.
- Remove valve core insert to increase air flow.
- If the tire is too loose an additional layer of rim tape often helps. This slightly increases the diameter of the rim and often helps in creating a slightly tighter seal with the bead of the tire.
- Replace rim tape if it is old, defective, or has severe indentations around the spoke holes. - Mount the tires with tubes beforehand and leave them to rest for 24 hours. This stretches the tire bead and brings it into the right shape.
- In stubborn cases, use a compressor or the Schwalbe Tire Booster instead of the floor pump.
WHAT CAN GO WRONG?
Of course there can also be leaks in the area of the valve or the rim. In order to determine this, it is necessary to keep the wheel completely under water or to coat it with assembly fluid. If there are any leaks, the air then escapes at the valve and/or the spoke nipples. This can take a while, as sufficient pressure must first build up in the rim cavity. The problem is often in the valve area. Possible remedy: Tighten the valve nut, clean and deburr the valve/rim contact area, replace the valve, replace the rim tape. If all this is unsuccessful, then a defect in the rim joint or a crack in the rim base may be the cause of the leak. A common cause of tubeless systems not staying airtight is that the sealant was not shaken sufficiently before filling (or before transferring). In this respect, many problems can be solved by “changing the sealant fluid” for new, well-shaken Doc Blue.
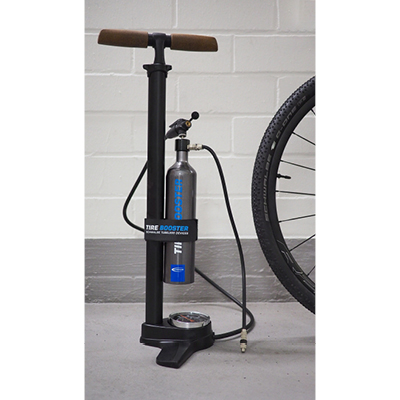
WHAT IS A TIRE BOOSTER? AND HOW TO USE IT?
A powerful blast of air is required to inflate a tubeless tire. Unfortunately, a floor pump is not sufficient for all wheels and very few users have a compressor at home. The Tire Booster can help here. Essentially, it is a pressure vessel that you can pump up to 11 bar with the floor pump. You then “shoot” the compressed air into the tires with a single "shot". In this way, even very stubborn tire/rim combinations can be inflated and a seal established.
INSTRUCTIONS FOR USE & SAFETY INSTRUCTIONS
The Tire BOOSTER supports you with tubeless assembly. All you need is the right tubeless equipment and a high-pressure bike pump with an attachment for Presta valves.
Instructions: (1) Clean the tire and rim before assembly. (2) Mount the tire on the rim as usual. Coat both tire beads with assembly fluid before inflating. The valve must be between the beads when inflating. (3) Close the Tire Booster Air Valve. (4) Screw the Tire Booster pump head onto the bicycle valve. With the adapter you can increase the air flow in the tires. To do this, remove the valve insert, screw the adapter onto the pump head of the Tire Booster and screw them together onto the valve stem. (5) Inflate Tire Booster (max. 11 bar/160 PSI). (6) Open vent valve. The tire snaps audibly into place on the rim. (7) Check that the tire is correctly seated on the characteristic curve. If pumping is required, this can be done via the Tire Booster (vent valve must be open). (8) Remove pump head. If necessary, fill in sealing liquid (e.g. Doc Blue Professional) and inflate the tires again.
! Tips:
- Be sure to observe the information on the maximum air pressure for tires and rims.
- Note the maximum pressure of the Tire Booster: 11 bar/160 PSI.
- Do not fill Tire Booster with a compressor.
- Do not use defective Tire Booster, tires or rims.
- Do not discharge compressed air in your eyes or face.
- Before inflating: make sure the pump head is correctly seated on the bicycle valve.
- Protect Tire Booster from direct sunlight. Avoid temperatures below -15°C or above +50°C.
- Store only with the vent valve open.
WHICH WHEELS ARE SUITABLE FOR TUBELESS OPERATION?
! Note: For safety reasons, you should only use wheels that have been approved by the manufacturer for tubeless operation.
There are a few wheels that call themselves tubeless or tubeless ready, but they don't yet meet the latest standards. You can still mount a tubeless tire on it, but you have to expect problems or greater effort during assembly. You often need a compressor or the Tire Booster to inflate. If you have any questions, please contact the wheel manufacturer.
Here you will find a list of road bike wheels that we have tested for safety, ease of assembly and pumpability.
A tubeless installation is usually impossible with very narrow rims (13C), very cheap rims or rims with eyelets in the drop center. In these cases it usually does not work to get the rims airtight with the rim tape.
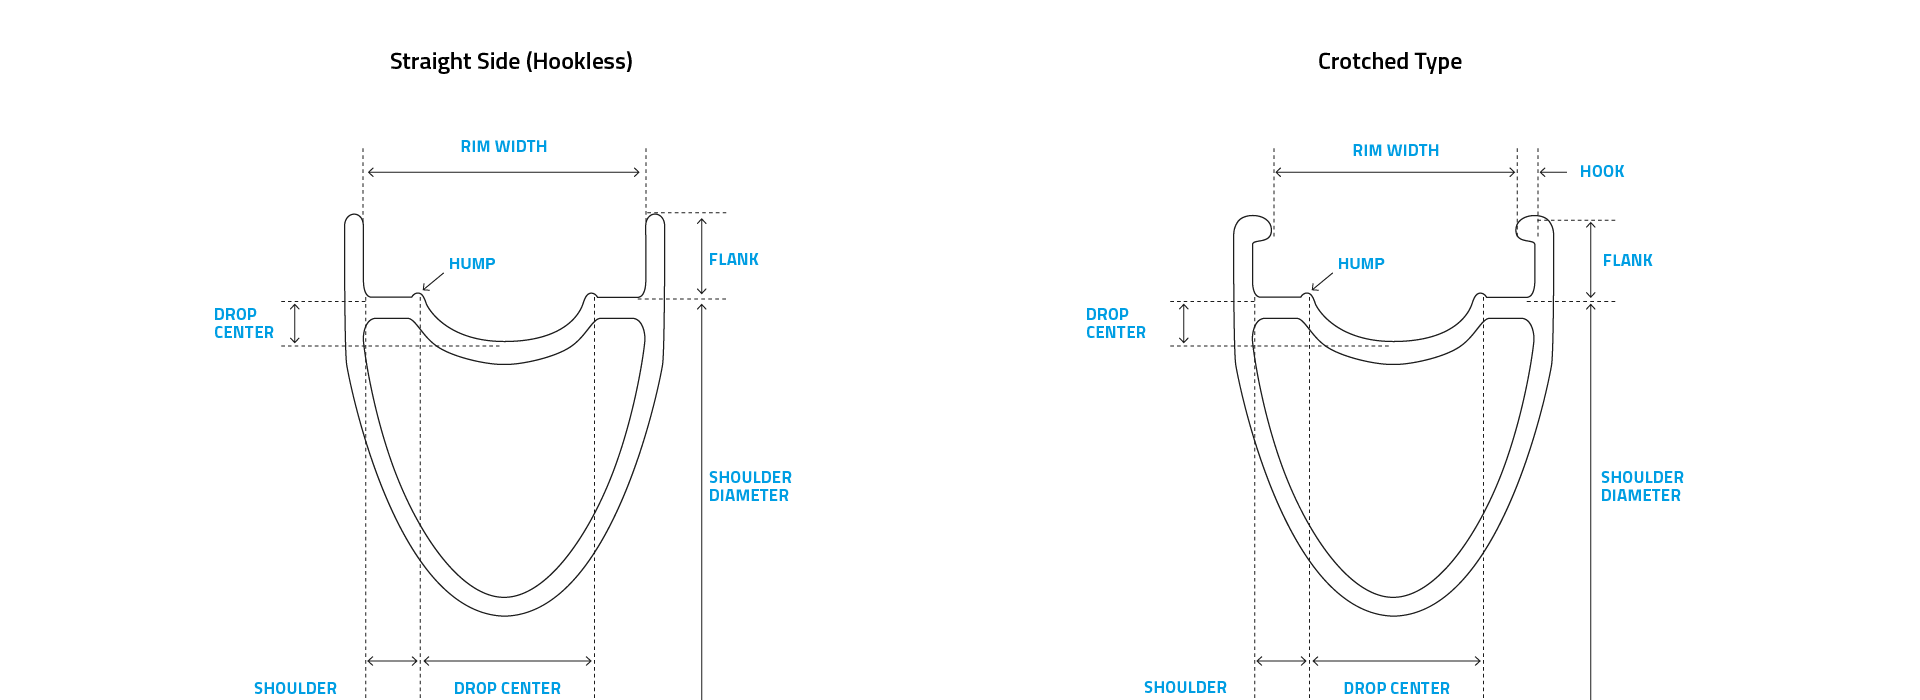
Be careful with rims with a low flank height (well below the ETRTO standard) and hookless rims. The jump safety is at least reduced here. There are some such rims that work very well with the right air pressure. However, you must absolutely comply with the air pressure specifications of the wheel manufacturer, some of which are significantly below the permissible tire air pressure.
WHAT HAS TO BE CONSIDERED WITH THE RIM TAPE AND THE VALVE?
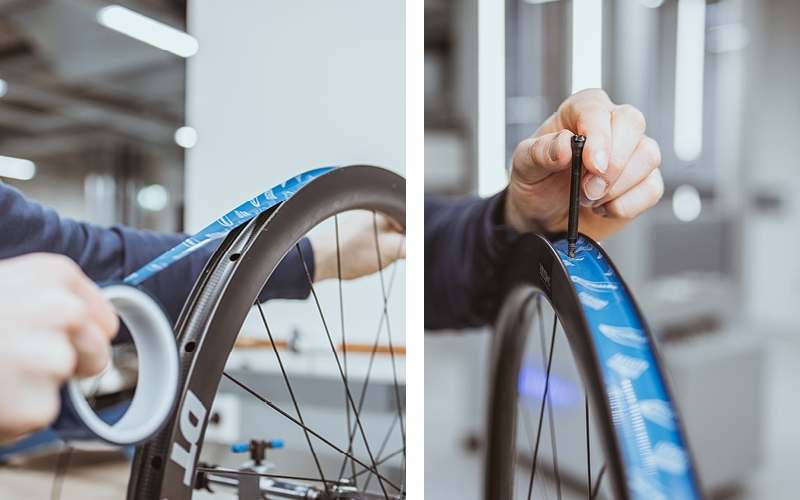
The Schwalbe tubeless rim tape is absolutely high pressure and heat resistant. One layer of rim tape is usually sufficient. For rims with a small shoulder diameter, a second layer is advisable for easier inflation. All spoke holes must be securely covered by the rim tape. It is best to cover the entire rim base. The rim tape usually fits well if it is 2-4 mm wider than the internal width of the rim. The base of the rim must be absolutely clean and level before laying the tape. Remove old adhesive and grease residues with brake cleaner. Apply the rim tape under strong tension so that no air bubbles form. At the end let the tape overlap by approx. 5-10 cm. We do not recommend having the overlap in the valve area. The Schwalbe tubeless valve is made of aluminum and is very light. The conical valve base is reinforced with metal and fits almost all rims. You can simply push the tubeless valve through the rim tape with the tip. The valve nut is absolutely necessary for tubeless operation in order to fix the valve securely in the rim. The valve nut is equipped with an anti-twist device so that the valve does not come loose while riding.
There are only a few rims that are already manufactured airtight. The airtightness is usually created by the special rim tape.
WHAT TO DO IN THE EVENT OF A BREAKDOWN?
Punctures are automatically sealed and repaired by Doc Blue while riding. Important: You have to continue riding or press the defective spot onto the ground. This flexing of the tire supports the function of the sealing fluid. Don't hold the defective spot up at the top of the wheel rotation as the sealing fluid will not be able to reach the defect in that position. Only in the case of very serious damage such as larger cuts or snake bites does the sealing fluid not help and is unlikely to be able to provide an effective seal. A replacement tube is still the best solution here. To do this, remove the tubeless valve and wipe out the sealing fluid as much as possible. The tube is not damaged if it is simply placed in the remaining sealant in the tire.
WHAT MIGHT ALSO INTEREST YOU

From the beginning we believed in tubeless technology and did a lot of pioneering work in research and development. Today we are convinced: Tubeless is the tire technology for performance-oriented cyclists! This applies to use on mountain and gravel bikes and especially on racing bikes.
Tires and rims must match. More specifically, the inner diameter of the tire must match the diameter of the rim shoulder. The tire size 37-622 fits e.g. on a rim 622 x 19C. In addition, tire width and inner rim width must be matched. Our overview shows possible combinations of tire width and inner rim width according to ETRTO.